
The extraction decision in Deadly Days: Roadtrip: reading the fuel gauge, threat level, dusk timing, reaper risk, and the math of one more crate.
Deadly Days Roadtrip Extraction Guide: When to Leave
Extraction is the part of Deadly Days: Roadtrip that separates it from a straight horde shooter. You are never forced to leave when the fuel gauge fills, and the game is designed so that the greedy choice is usually correct for another minute and fatal for another five. This guide is about pricing that minute.
Official source: Deadly Days: Roadtrip store page
More sources: Pixelsplit — Deadly Days: Roadtrip and Steam news hub.
What extraction actually requires
Each stage has a fuel target. Fuel is found in loot spots, on the ground, and occasionally dropped by enemies. When the gauge is full, the bus can leave. The bus is usually parked at the edge of the map, so the real cost of extraction is the walk back, not the button press.
Three states matter:
- Gauge empty. You cannot leave. Every decision is about finding fuel.
- Gauge full, day. You can leave, and the map is still manageable. This is the safest window.
- Gauge full, night. You can leave, but the walk back crosses a horde and possibly the reaper.
Most deaths happen in state three. The fix is to treat state two as the deadline, not the opportunity.
The one-more-crate calculation
Before you open another container after the gauge fills, ask three questions:
- How far is the bus? If the answer is "across the map", the crate has to contain something run-defining.
- How much time until dusk? If the light is already orange, the answer is no.
- What is the exit route? A route through a narrow street is worth less than a route through open ground, because the horde funnels.
A useful rule: after the gauge fills, you may loot one cluster that is on the way to the bus. You may not loot a cluster that requires turning around. That single rule prevents most overstay deaths without costing meaningful loot.
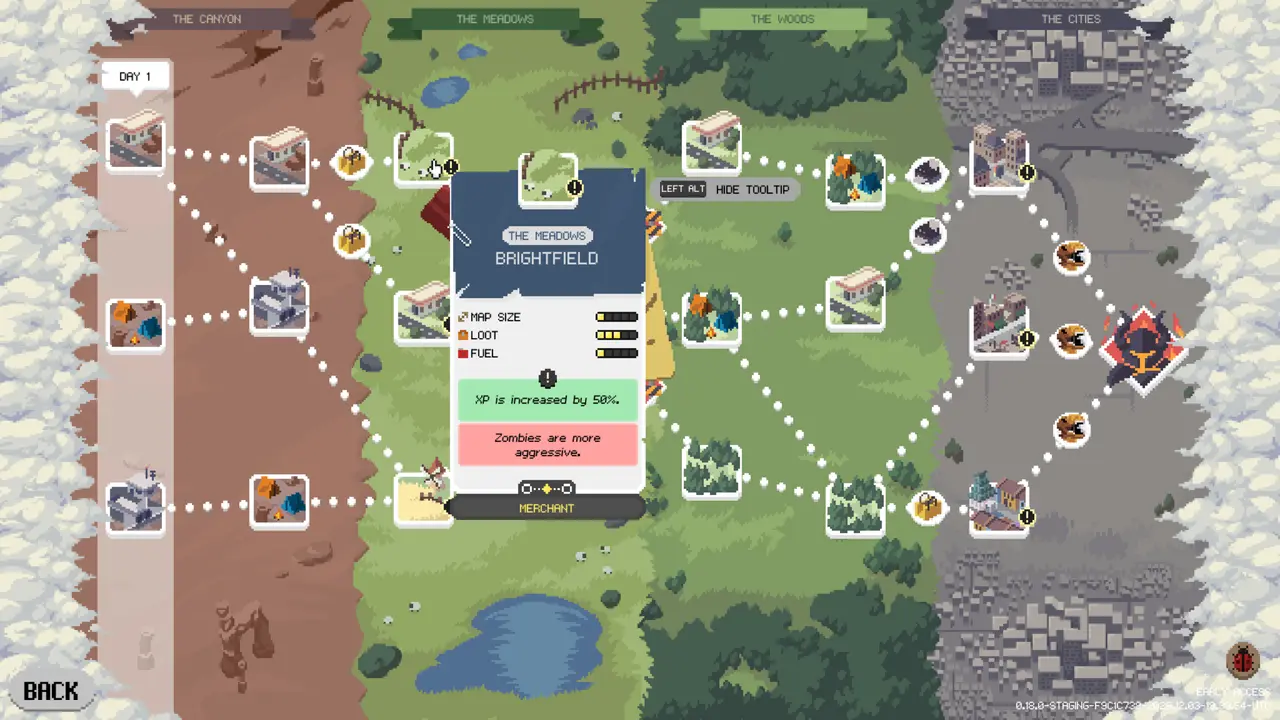
Threat level is a clock, not a difficulty setting
The threat level rises the longer you stay. It changes enemy density and composition, and at high values it brings the reaper. The reaper is not a boss you are supposed to fight on a normal run; it is the game telling you that the stage is over. It appears around the twelve-minute mark if you overstay.
That makes the threat level a clock with a visible hand. If you are at the point where elites are spawning in pairs, you are already past the intended extraction window. The death unlock guide covers the one situation where you want the reaper to find you.
On a boss stage, the fuel target and the boss are separate objectives. Clear the fuel first so the bus is ready, then fight. A boss win with an empty gauge and a night wave is not a win.
Route order: fuel first, shops second, loot third
The most consistent extraction pattern is:
- Fuel cluster. Open the map, mark every fuel icon, and take the shortest path that touches at least two.
- Shop on the line. Buy only what fits the bag you have, not the bag you want.
- Loot the return path. Loot buildings between the last fuel spot and the bus, so every container is on the way out.
- Boss or event. Only after the gauge is full and the route home is known.
This order converts the map into a loop with the bus at one end. It also means you never walk across the map twice.
When a detour is worth it
Some detours justify the risk:
- A guaranteed legendary chest. If the map marks a high-rarity crate and you have space, take it before dusk.
- A biome event with a permanent reward. Unlocks, new survivors, and recipe ingredients persist beyond the run.
- A merchant selling a build-defining item. The Shady Merchant's cursed goods are worth a detour; a cosmetic is not.
- A second fuel cluster that lets you skip the next stage's search. Fuel economy compounds across the route.
And some never are:
- A crate behind a boss you cannot beat. Fight the boss when your build is ready, not because the crate is shiny.
- A detour at night with no Teleporter. The walk back is the cost.
- A second shop after you have spent your scrap. You are paying time for nothing.
Tools that change the decision
Teleporter. At night, once the fuel is full, it sends you to the bus. This converts a dangerous walk into an instant exit and is the single best extraction item in the game.
Coffee. Movement and loot speed, plus a slightly longer day. It buys you one more cluster before dusk.
Ghost Sheet. Looting while see-through means you can fill the last containers in a horde without clearing it.
Radar. A one-time unlock that shows crate and gas canister rarity on the map. It turns route planning from guesswork into prioritisation.
Extraction and the run economy
Leaving early is not a loss. The items you extract with, the scrap you bank, and the XP you earned all carry forward. The loot you leave behind is gone either way. What you are really protecting is the run's compounding value: a survivor who reaches the next stage with a finished build is worth more than a survivor who dies at night with a full bag.
If you are unsure, leave. The next stage gives you another map, another fuel gauge, and another chance at the item you wanted. The reverse is not true.
FAQ
Can I extract with an empty gauge? No. The bus will not move until the fuel target is met.
Does the reaper always appear at twelve minutes? It appears when you overstay, around that mark. Events and modifiers can bring it earlier.
Do I keep loot if I die? No. Run items and scrap are lost; meta currency and unlocks remain.
Is it worth fighting the reaper? Only with a completed build, and mainly for the duct tape drop. See the duct tape guide.
Related
More Deadly Days: Roadtrip Guides
How Deadly Days: Roadtrip co-op works: couch split-screen, Remote Play Together, controller needs, cross-backpack synergies and shared-run roles.
Deadly Days: Roadtrip codes checked for the 1.0 build: how to redeem, which strings are confirmed, which are community reports, and the scams to avoid.
How crafting works in Deadly Days: Roadtrip: duplicate merging, confirmed recipes, the five craft-only 1.0 weapons, and when to hammer an item.
What duct tape unlocks in Deadly Days: Roadtrip, the reliable sources (bosses, reaper, achievements), and the order worth spending it in.
How Endless Mode scales in Deadly Days: Roadtrip, which builds survive the curve, and the item priorities that stop a finished run from falling over.
A working list of Deadly Days: Roadtrip items: support, trigger, mobility, sustain, cursed merchant goods and character items, with what each one does.
How legendary loot works in Deadly Days: Roadtrip: rarity, merging, glowing crates, the radar, boss drops, and the fastest ways to farm high-rarity gear.
Every Deadly Days: Roadtrip map system explained: biome enemies, fuel icons, shops, event stops, Labyrinth, Pumpkin Patch, and route planning.